
Autocomplete with Remote Views JSON Data
With Views Datasource, we can create a View that can be used to retrieve the remote JSON data that we need for an autocomplete field.
Example with Views Datasource (Views JSON)
Since Drupal comes with a default Content Type called "Article", this example will make an Autocomplete field for Article node titles.
If instead you want to use, a custom hook_menu() page callback associated with a Drupal module, then check out the Autocomplete with Custom Remote Data page.
Create a Few Article Nodes for Demonstration
If you haven't already, create a few Article nodes and take note of their titles. We'll use these nodes in our example below. Create a Views JSON Page Display
First we'll need a View with an exposed filter to handle the remote data fetching. Go to:
admin/structure/views/add
Then, input these values:
- View name: My Articles Autocomplete
- Machine name: my_articles_autocomplete
- Show Content of type Article sorted by Title
- Check the "Create a page" box
- Path: my-articles-autocomplete
- Display format: JSON data document
- Items to display: 5
- Uncheck "Use a pager"
Next, click "Continue & Edit", then:
- Under "FORMAT", click "Settings"
- Uncheck the "Views API mode" checkbox
- Click "Apply"
Then under "FIELDS", click "Add", then:
- Search for: nid
- Check the box for "Content: Nid"
- Click "Apply"
- Check "Create a label"
- Change "Label" to: nid
- Click "Apply"
Then under "FILTER CRITERIA", click "Add", then:
- Search for: title
- Check the box for "Content: Title"
- Click "Add and configure filter critiera"
- Check "Expose this filter to visitors, to allow them to change it"
- Check "Required"
- Change "Label" to: title
- Under "Operator" select "Starts with" or one of the "Contains..." options
- Under "Advanced" set the "Filter operator" to "title"
- Click "Apply"
Finally, click "Save" on the view.
Preview Results
Now you should use the "Auto preview" mode in Views to make sure the filter is working properly. Type in the first letter of an Article's node title into the "title" field and then click "Apply".
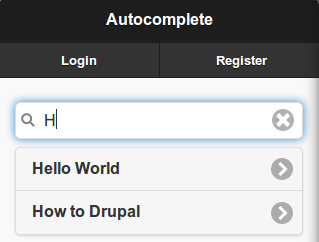
Alternatively, you can try hitting the URL to get the JSON results. For example, this will return the titles of nodes that start with "H":
http://www.example.com/my-articles-autocomplete?title=H
If there are any node(s) that begin with "H", they'll be returned in a data set that looks something like this:
{
  nodes: [
    {
      node: {
        title: "Hello World",
        nid: 123
      }
    },
    {
      node: {
        title: "How to Drupal",
        nid: 456
      }
    }
  ]
}
Create a Mobile App Page with Autocomplete
Now we're ready to create a page in our mobile app with an autocomplete input:
/**
 * Implements hook_menu().
 */
function my_module_menu() {
  var items = {};
  items['my_autocomplete'] = {
    title: 'Autocomplete',
    page_callback: 'my_module_autocomplete_page'
  };
  return items;
}
And now we create the page_callback function to display the autocomplete input:
/**
 * Page callback for autocomplete input.
 */
function my_module_autocomplete_page() {
  try {
    var content = {};
    content.my_autocomplete = {
      theme: 'autocomplete',
      remote: true,
      path: 'my-articles-autocomplete',
      value: 'nid',
      label: 'title',
      filter: 'title'
    };
    return content;
  }
  catch (error) { console.log('my_module_autocomplete_page - ' + error); }
}
How it Works
We set remote equal to true, and provide the path to our Views JSON Page Display:
my-articles-autocomplete
We also specified the field names to use for the value and label of each result item. From the View we created earlier, our field names were nid and title.
This means when an autocomplete result item is clicked, the node id of the item will be placed into the hidden input of the autocomplete, and the node title of the clicked item will be placed into the autocomplete text field.
We also specified the filter, which indicates which field the autocomplete text input will be filtered against. In this case, we wanted to filter against the node title. So when we input text into the autocomplete text field, this path will automatically be queried:
my-articles-autocomplete?title=H
To pass along additional query string parameters, use the params property, for example:
content.my_autocomplete = {
  /* ... */
  params: 'soda=drpepper&burrito=chicken'
  /* ... */
};
This will produce a path like so:
my-articles-autocomplete?title=H&soda=drpepper&burrito=chicken